It's really good to think of reading a textbook instead of a bunch of papers of your class.
In Thailand, Educational system in higher level such Bachelor's Degree in many high-rank University
still using a bunch of papers, which we called "sheet", for teaching during class.
It's just a slide-printed on paper. So, seems like I can't find much of details in there.
For me, to know and understand what I learned from class is to read the whole details of the topics,
not only the topics and some of information that lied around the paper.
On my last exam I took, which is today, about noon. It's the Internet Programming class.
It's about Servlets and JSP. Unfortunately, I've skipped 2 classes, my head's gone empty
until I've found a book which tutor's using as reference. Head First Servlets and JSP
It's really great book! I recommended for this book if you're totally new to Servlets and JSP.
But, it required some of Java Skills. So, you might need to know Java before start reading this one.
Oh, I didn't buy the book actually, I borrowed it from the library at my Institute.
Don't look in the bad way. I don't have that much of money to spend, even I did spend a lot
on many books from Amazon.com
Anyway, I'm totally like this book. It have great content. Also,the way they represent details on each topic is
like..you know, It's comic, full of pictures and images. It's good for your brain when you've to
remember something so complicated.
That's all for today :)
Thursday, December 16, 2010
Tuesday, December 7, 2010
Insertion Sort and Merge Sort in Java
Well it's my homework in DAA (Design and Analysis of Algorithms)
Talking about the algorithms, itself is brought from the book that we've used
which is "Introduction to Algorithms 3rd edition"
It's a good book, but I do weak in maths somehow.
So, probably there is some of them I couldn't understand right away.
It's bad to have a worst logic and maths skill, you know?
whatever, let's see the code that I have written using Java.
(Somebody said that they doesn't like Java because of its performance,
But I don't. I prefer it than C/C++ in some way.)
Insertion Sort
then we lock the key so we won't get confuse between
the length of array we are caring and the one that is still out of our sight.
after that we just sorting it, by compare the value of an array, one by one.
when it have sorted, we just change the key. moving to the next one until the whole array is sorted.
Merge Sort
The first one is for divide an array into separate two of them.
Another one is for merging them together.
I won't explain it clearly because it will take me a while to try to explain it.
As you can see that I'm not English native, so It's quite hard to write.
And It's all for tonight. I'm late for my bed again.
Thanks for reading
:)
Talking about the algorithms, itself is brought from the book that we've used
which is "Introduction to Algorithms 3rd edition"
It's a good book, but I do weak in maths somehow.
So, probably there is some of them I couldn't understand right away.
It's bad to have a worst logic and maths skill, you know?
whatever, let's see the code that I have written using Java.
(Somebody said that they doesn't like Java because of its performance,
But I don't. I prefer it than C/C++ in some way.)
Insertion Sort
This one works based on the algorithms of insertion sort. First we find the key.public static void insertionSort_2(int x[]) {int i, j, key;for (j = 1; j < x.length; j++) {key = x[j];i = j - 1;while (i >= 0 && x[i] > key) {x[i + 1] = x[i];i = i - 1; .}x[i + 1] = key;}}
then we lock the key so we won't get confuse between
the length of array we are caring and the one that is still out of our sight.
after that we just sorting it, by compare the value of an array, one by one.
when it have sorted, we just change the key. moving to the next one until the whole array is sorted.
Merge Sort
Merge methodpublic static void merge_sort(int y[], int p, int r) {if (r > p) {int q = (p + r) / 2;merge_sort(y, p, q);merge_sort(y, q + 1, r);merge(y, p, q, r);}}
For merge sort, there are two method you need.public static void merge(int y[], int p, int q, int r) {int n1 = q - p + 2;int n2 = r - q + 1;int i, j, k;int []left = new int[n1];int []right = new int[n2];//Cp y to left arrayfor (i = 0; i < n1 - 1; i++) {left[i] = y[p + i];}left[n1 - 1] = INF;//Cp y to right arrayfor (i = 0; i < n2 - 1; i++) {right[i] = y[q + 1 + i];}right[n2 - 1] = INF;i = 0;j = 0;for (k = p; k <= r; k++) {if (left[i] <= right[j]) {y[k] = left[i];i++;} else {y[k] = right[j];j++;}}}
The first one is for divide an array into separate two of them.
Another one is for merging them together.
I won't explain it clearly because it will take me a while to try to explain it.
As you can see that I'm not English native, so It's quite hard to write.
And It's all for tonight. I'm late for my bed again.
Thanks for reading
:)
Friday, November 19, 2010
Another way to install VMWare Server 2 on Ubuntu 10.04
The first way I've provided is not the only way that you could follow in order to install VMWare Server 2.
Now Let's consider this method of installation.
1. Download VMware Server (VMware-server-2.0.2-203138.i386.tar.gz).
2. Download the VMware Server 2 update patch #2
Note :
1. Don't forget to add a new administrative user when it asked for.
2. The VMWare Remote Console Plug-in doesn't work properly on Ubuntu 10.04. You can set the environment variable VMWARE_USE_SHIPPED_GTK before running the VMWare Remote Console Plug-in. You can do this by add the following line to your ~/.profile
Credits : Rise Security
Now Let's consider this method of installation.
1. Download VMware Server (VMware-server-2.0.2-203138.i386.tar.gz).
2. Download the VMware Server 2 update patch #2
3. Extract VMWare Server$ wget -N http://risesecurity.org/~rcvalle/VMware-server-2.0.2-203138-update-2.patch
4. Extract VMWare Server Modules$ tar -xzf VMware-server-2.0.2-203138.i386.tar.gz
5. Apply the patch$cd vmware-server-distrib/lib/modules/source$tar -xf vmci.tar$tar -xf vmmon.tar$tar -xf vmnet.tar$tar -xf vsock.tar
6. Archive VMWare Server Modules again$cd vmware-server-distrib/$patch -p1 < ../VMware-server-2.0.2-203138-update-2.patch
7. Run the installer script as root$cd vmware-server-distrib/lib/modules/source$rm -f vmci.tar$rm -f vmmon.tar$rm -f vmnet.tar$rm -f vsock.tar$tar -cf vmci.tar vmci-only/$tar -cf vmmon.tar vmmon-only/$tar -cf vmnet.tar vmnet-only/$tar -cf vsock.tar vsock-only/
$cd vmware-server-distrib/$sudo ./vmware-install.pl
Note :
1. Don't forget to add a new administrative user when it asked for.
2. The VMWare Remote Console Plug-in doesn't work properly on Ubuntu 10.04. You can set the environment variable VMWARE_USE_SHIPPED_GTK before running the VMWare Remote Console Plug-in. You can do this by add the following line to your ~/.profile
export VMWARE_USE_SHIPPED_GTK=yes
Credits : Rise Security
Tuesday, November 16, 2010
Where is my datastore!? (VMWare Server 2 on Ubuntu Lucid)
reJust put your own existing virtual machine in to this place and added it into your datastore with vmware-web console.
/var/lib/vmware/Virtual MachinesThat's all :)
when 503 Service Unavailable comes up!! (cause from vmware server2)
Ok after last night I've recently finished my vmware server 2 installation.
I came back this evening and found that I couldn't connect to my vmware web console.
And it keeps telling me that 503 service unavailable thing. so I google and found some interesting solution.
Let's start with stopping all of its services.
For me "rmmod" doesn't work. So I use hard remove (just delete it where they are.)
How to find it? easy!
So I removed all of them
I came back this evening and found that I couldn't connect to my vmware web console.
And it keeps telling me that 503 service unavailable thing. so I google and found some interesting solution.
Let's start with stopping all of its services.
$/etc/init.d/vmware stopIf it resulted in something like this. (Something just resulted in "Failed")
Stopping VMware services:or when you try to start your vmware and you resulted in
Virtual machine monitor failed
Bridged networking on /dev/vmnet0 done
DHCP server on /dev/vmnet1 done
Host-only networking on /dev/vmnet1 done
DHCP server on /dev/vmnet8 done
NAT service on /dev/vmnet8 done
Host-only networking on /dev/vmnet8 done
Virtual ethernet failed
$sudo /etc/init.d/vmware startIt's telling you to run vmware-config.pl again. So I try to do as it said. It resulted in this.
vmware is installed, but it has not been (correctly) configured
for this system. To (re-)configure it, invoke the following command:
/usr/bin/vmware-config.pl.
Then you need to remove the 3 mods that it mentioned with rmmod.The following VMware kernel modules have been found on your system that werenot installed by the VMware Installer. Please remove them then run thisinstaller again.
vmmonvmcivmnet
I.e. - 'rm /lib/modules/2.6.28-11-generic/misc/<ModuleName>.{o,ko}'
Execution aborted.
For me "rmmod" doesn't work. So I use hard remove (just delete it where they are.)
How to find it? easy!
$locate [THINGS YOU WANT TO FIND]mine is in the /lib/modules/2.6.32-24-server/misc/
So I removed all of them
$rm /lib/modules/2.6.32-24-server/misc/*There you go! now you can stop vmware services and reconfigure your vmware-config.pl
$/etc/init.d/vmware stop
$/usr/bin/vmware-config.plCredits : Ubuntu forum
Installing VMWare Server 2 on Ubuntu Lucid Lynx (10.04)
After conversion those files, now it's time for a new clean install ubuntu and vmware server 2.
I'll skip the ubuntu installation, it's the thing you gotta do by your own, not so hard.
Let's take a look in the first step before install vmware server 2 after clean installed of ubuntu.
1. Don't forget to update and upgrade all the necessary packages.
5. Because the ubuntu 10.04 has update its kernel to 2.6.32 so you need to patch you vmware package before apply the installation. Go download script from here
6. Run the script with super user rights either in the same folder where you have downloaded the server archive (mine is /home/mazaruz/VMware-server-2.0.2-203138.x86_64.tar.gz.gz So I put the scripts in /home/mazaruz/ )
8. the license key can be found in vmware website when you registered there. just copy it.
9. All is finish!!
Credits : Radu Thank you for a nice script :)
I'll skip the ubuntu installation, it's the thing you gotta do by your own, not so hard.
Let's take a look in the first step before install vmware server 2 after clean installed of ubuntu.
1. Don't forget to update and upgrade all the necessary packages.
sudo apt-get update
sudo apt-get upgrade2. Build essential packages
sudo apt-get install buil-essential3. If you don't have gcc, you might want to install this package before the installation.
sudo apt-get install gcc4. Download the vmware package and put in somewhere you want to.
5. Because the ubuntu 10.04 has update its kernel to 2.6.32 so you need to patch you vmware package before apply the installation. Go download script from here
6. Run the script with super user rights either in the same folder where you have downloaded the server archive (mine is /home/mazaruz/VMware-server-2.0.2-203138.x86_64.tar.gz.gz So I put the scripts in /home/mazaruz/ )
chmod +x vmware-server.2.0.1_x64-modules-2.6.30.4-fix.sh
sudo ./vmware-server.2.0.1_x64-modules-2.6.30.4-fix.sh [PATH_TO_VMWARE_ARCHIVE]7. Then it'll lead you to the installation of vmware itself. just do as it said. Don't forget to add your new user for administration your vmware server.
8. the license key can be found in vmware website when you registered there. just copy it.
9. All is finish!!
Credits : Radu Thank you for a nice script :)
Sunday, November 14, 2010
Migration back from Esxi4 to Server2
It looks like my server can't handle this esxi anymore.
All of the virtual machines slow down for weeks.
So, I've been trying to do migration for 3 days.
And Today I've found a way to do it easily.
First you gotta have a VMware vCenter Converter Standalone Product
you can download it for free at vmware.com
Now you got installed, It will be like this.

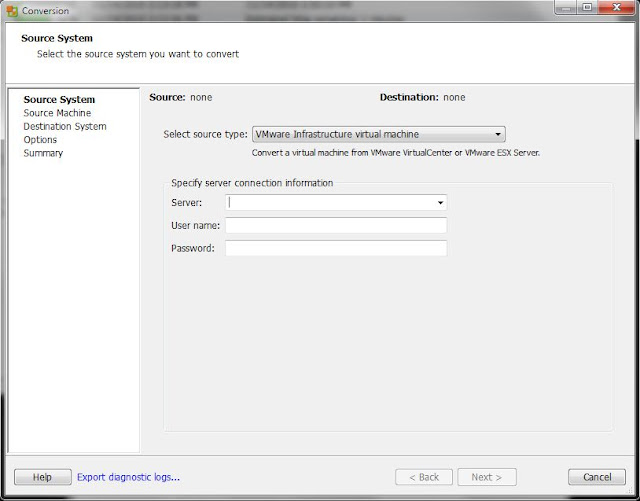
Then just select Convert Machine on the left side of the panel.
It will ask you whether type you want to convert. I choose the first one
"VMware Infrastructure virtual machine"
Don't forget to enter your esxi's address and username with password.
Then choose the virtual machine you'd like to convert.

Wait until it completed converting. Then it's all done!!
All of the virtual machines slow down for weeks.
So, I've been trying to do migration for 3 days.
And Today I've found a way to do it easily.
First you gotta have a VMware vCenter Converter Standalone Product
you can download it for free at vmware.com
Now you got installed, It will be like this.

Then just select Convert Machine on the left side of the panel.
It will ask you whether type you want to convert. I choose the first one
"VMware Infrastructure virtual machine"
Don't forget to enter your esxi's address and username with password.

Then choose the virtual machine you'd like to convert.

Wait until it completed converting. Then it's all done!!
Subscribe to:
Posts (Atom)